
Leaderboard


Popular Content
Showing content with the highest reputation since 08/30/2021 in Posts
-
Hello, I am joining this forum with hopes to be able to supply you guys with some hard to come by parts for your beloved Nissans, as the title states we are the second oldest Nissan dealer in the uk and we are looking to move some of our older parts that have been stored away for years. I will be doing a follow up post with our parts list which should have thousands of items for you guys to sift through at your leisure, I just wanted to test the waters to see how helpful this would be for you guys, any responses or comments appreciated. Kind regards, Oscar2 points
-
Hi all! Im thinking of getting a Pathfinder in the next month or two. Wanted something bigger for going fishing/camping and always loved the look of the Pathfinder. Especially the older shape (07/08 models). Has anyone got a rot free one with upgraded timing chain they are thinking of parting with? Thanks in advance 🤘🏻🙂 Harry2 points
-
Howdy all.. thanks for the add..1 point
-
Hi Mike, I have a completely stock 350z for sale. Are you still on the search for a well maintained one? thanks, Fred.1 point
-
HELLO MEMBERS, can any one help please, I have a Nissan Ebro Camper van 1985, I think its the only one left in the UK? I am trying to locate replacement head lamps ? I hope someone out there can assist? many thanks David
 1 point
 -
Hi Trevor, Thank you for your input, anything helps at this point, much appreciated! All the best, Daniel1 point
-
It should be something like selecting the individual seat position and then depressing the position number 1 or 2 button (depending on who is driving at the time) for a short period of time1 point
-
Thank you Trevor for this guidance. I shall follow your advice and update you in due course. Fingers crossed 🤞 Wayne1 point
-
Thanks - I got a new primer pump and it didn't help at all. I could try a new filter, but I did change that one recently.1 point
-
Maybe it is the same sensor part number if the lead is long enough to reach - that is assuming it has a B sensor.....if you do find another there, change the plugs over to the A sensor and see if the fault transfers to A sensor1 point
-
Hi All Just introducing myself. I have owned my 2005 350Z Roadster for circa 10 years now and enjoyed it. My other automotive hobby being a Megapin single seater circuit race car which I am rebuilding as it has been garaged by the previous owner for several years. I am replacing the engine and all the fibreglass parts with carbon fibre which has taken me circa 3-4 years to perfect. So I now offer carbon fibre parts like aero boot wings etc My 350Z has lots of parts during my ownership including a Jap speed K4 cat back exhaust, Mohair soft top, lots of bracing and I am about to replace the throttle body for the 75mm offering, I just need to machine the fitting plate and make a 75mm carbon fibre inlet pipe. In my early days of ownership like lots of other owners experienced the knock from the front suspension so replaced the shocks & springs then found out it was the Barings in the banana arm Dhoh. Thats reminds me I still have the original shocks and springs lol Anyway I hope to be posting some of my experiences with the car and I'm happy to help anyone thats encounters anything I have experience with. Cheers Chris1 point
-
Hi Chris This sounds like the baring in the banana arm on my 350Z.1 point
-
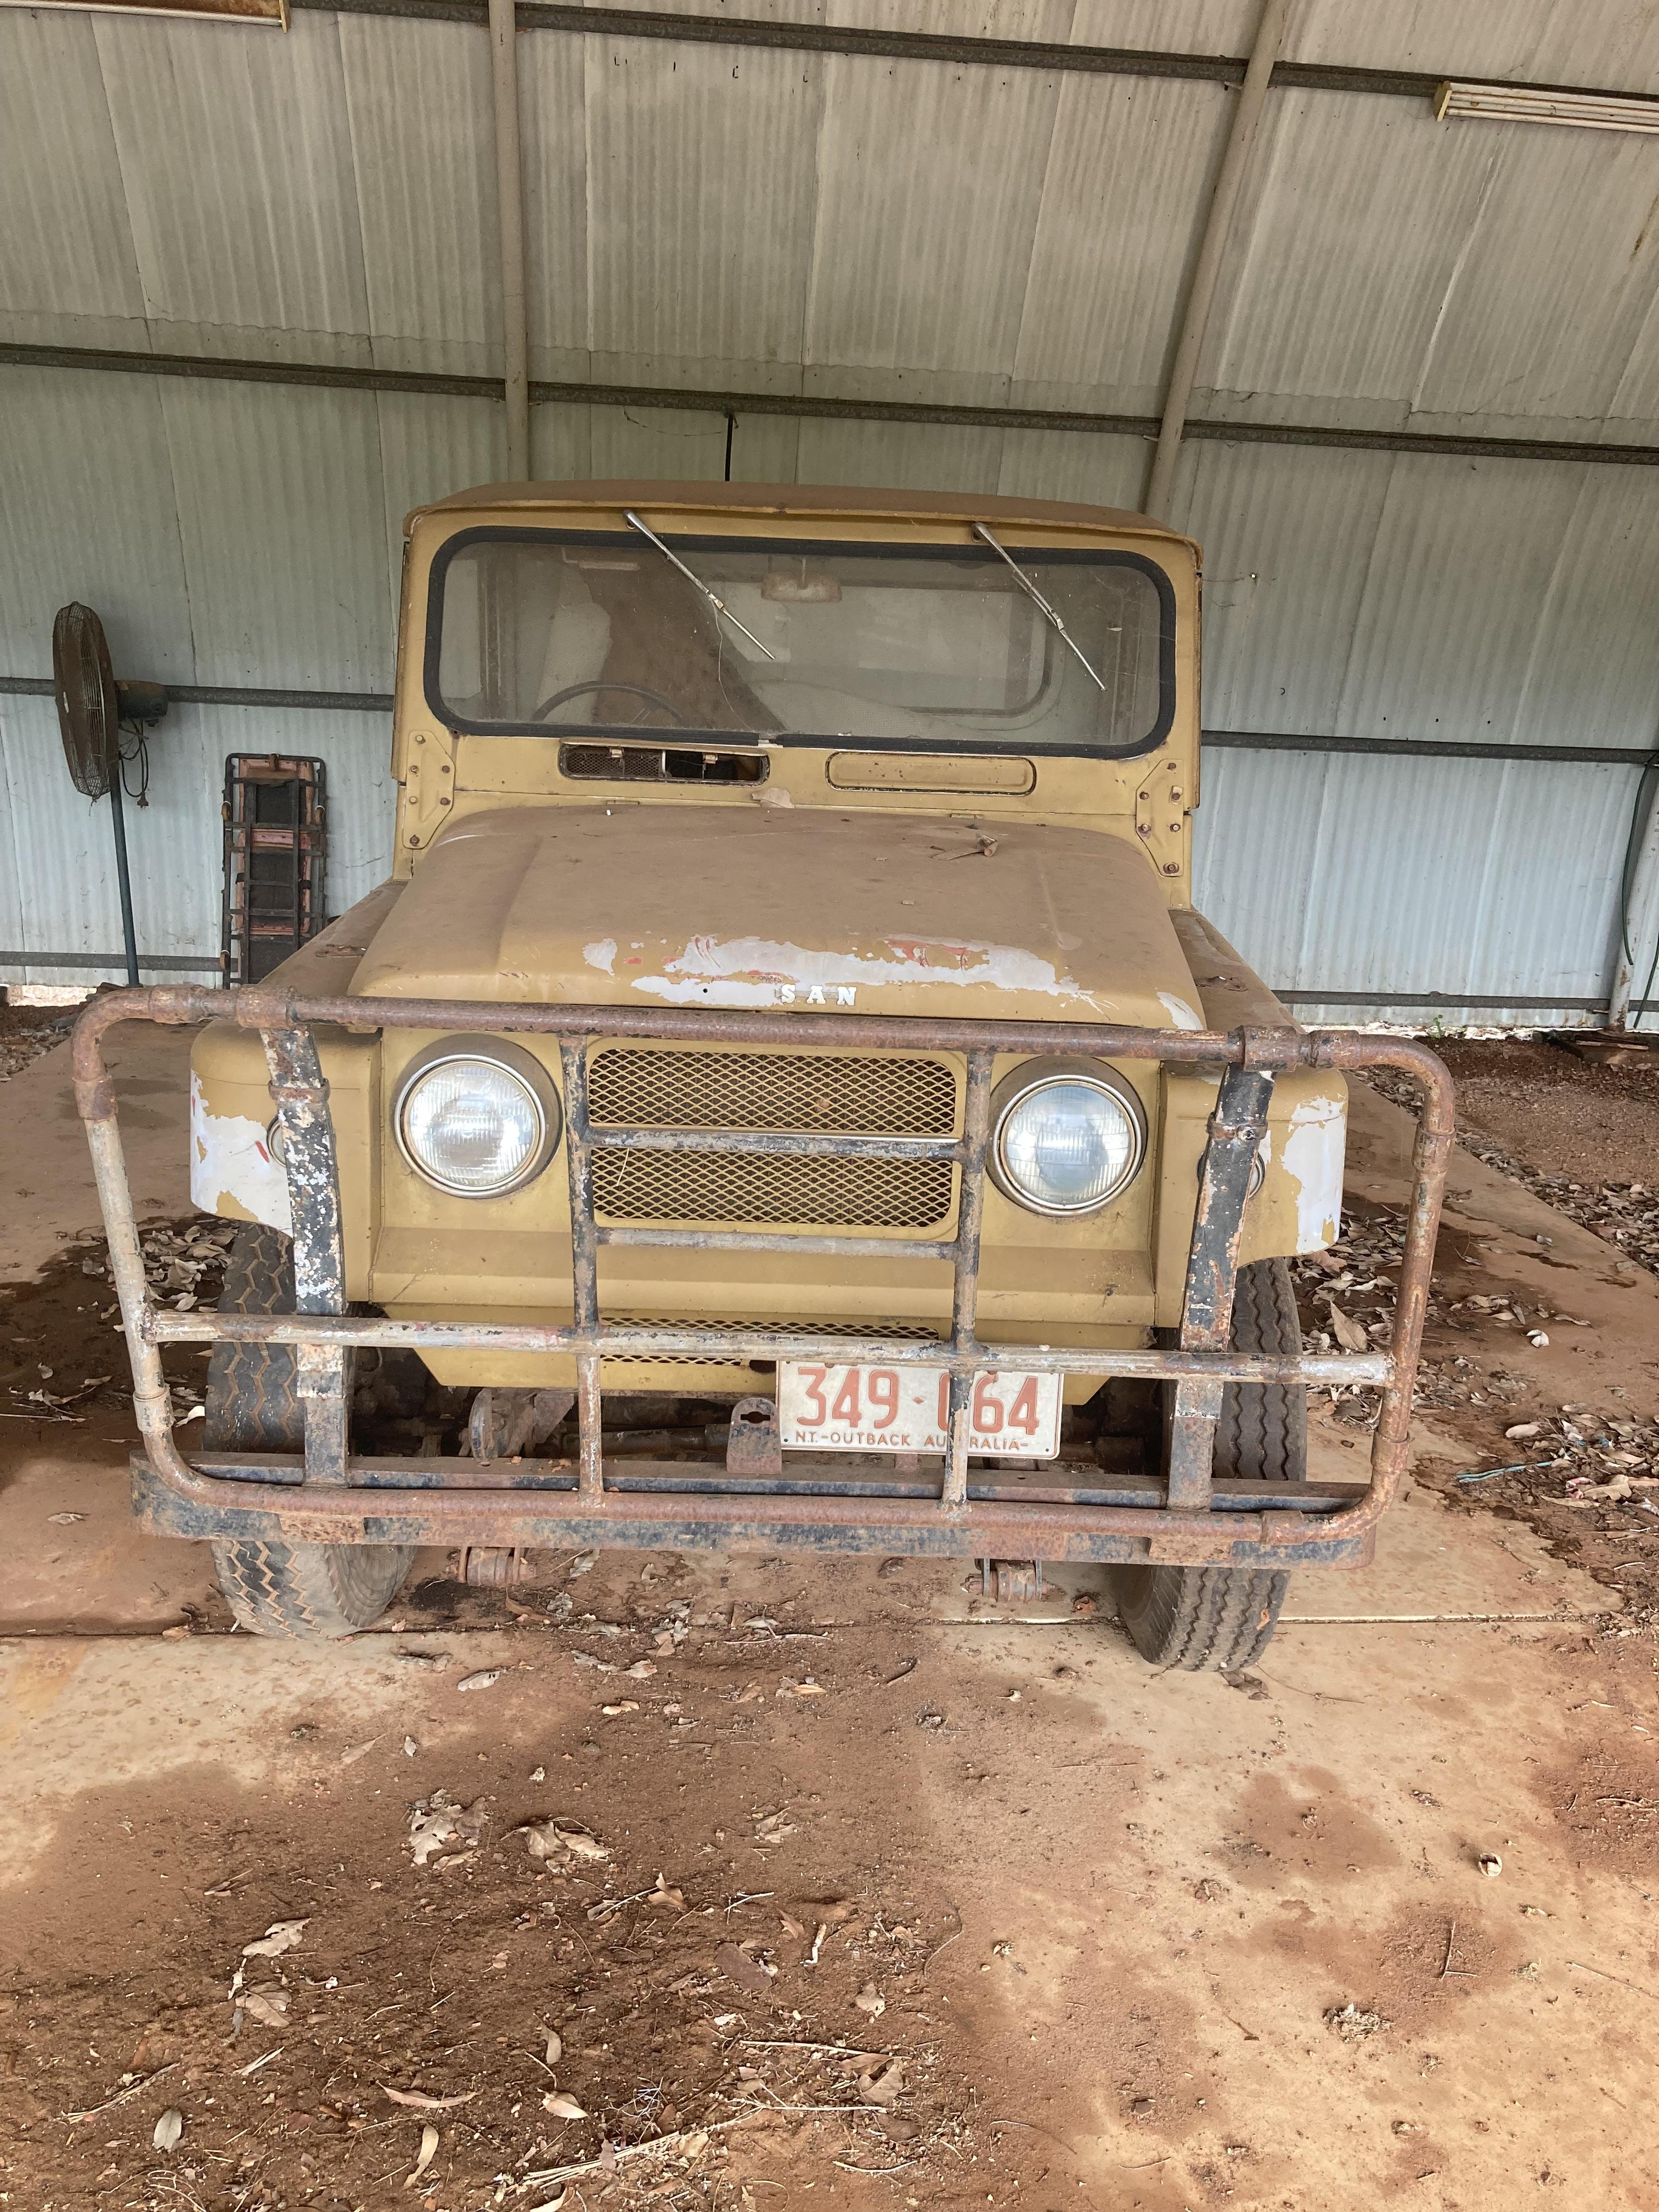
Hi there, I have a 1967 Nissan Patrol sitting in my shed. Originally the family car, then in recent times used as a fire fighting vehicle on acreage. Last three years not used at all.Original engine turns over (with a squirt of fuel into Carby) Odometer 98,000 miles. This would be a great project for an enthusiast but I don’t know where to start to advertise my vehicle or what value I should place on it. Can anyone offer any guidance? Thank you in anticipation.
 1 point
 -
All sorted now .......good old youtube!1 point
-
Hi I did managed to remove that, however after i paint them i cannot put them back due to yellow clip is loose in the rail and i cannot remove it. Please help1 point
-
Hi...welcome to the Club Can't go too wrong with a Micra. Simple engineering and go on for years Good to have you onboard!1 point
-
I have a 2008 K12 Nissan Micra I am looking for set of new rear wheel brake dust covers I have a part number 44030AX600 but do not know what side of the car this dust plate is for. I am having a very very difficult time finding these covers. I would also willing to accept replica covers as long as thay are new but would prefer origenal Covers Ian1 point
-
Hello I also have 2007 Highway Star and with it came an owners manual in English. The company is JPNZ instructions are torequest a repair manual for this vehicle visit www.jpnz.co.nz and select Workshop/Repair Manual1 point
-
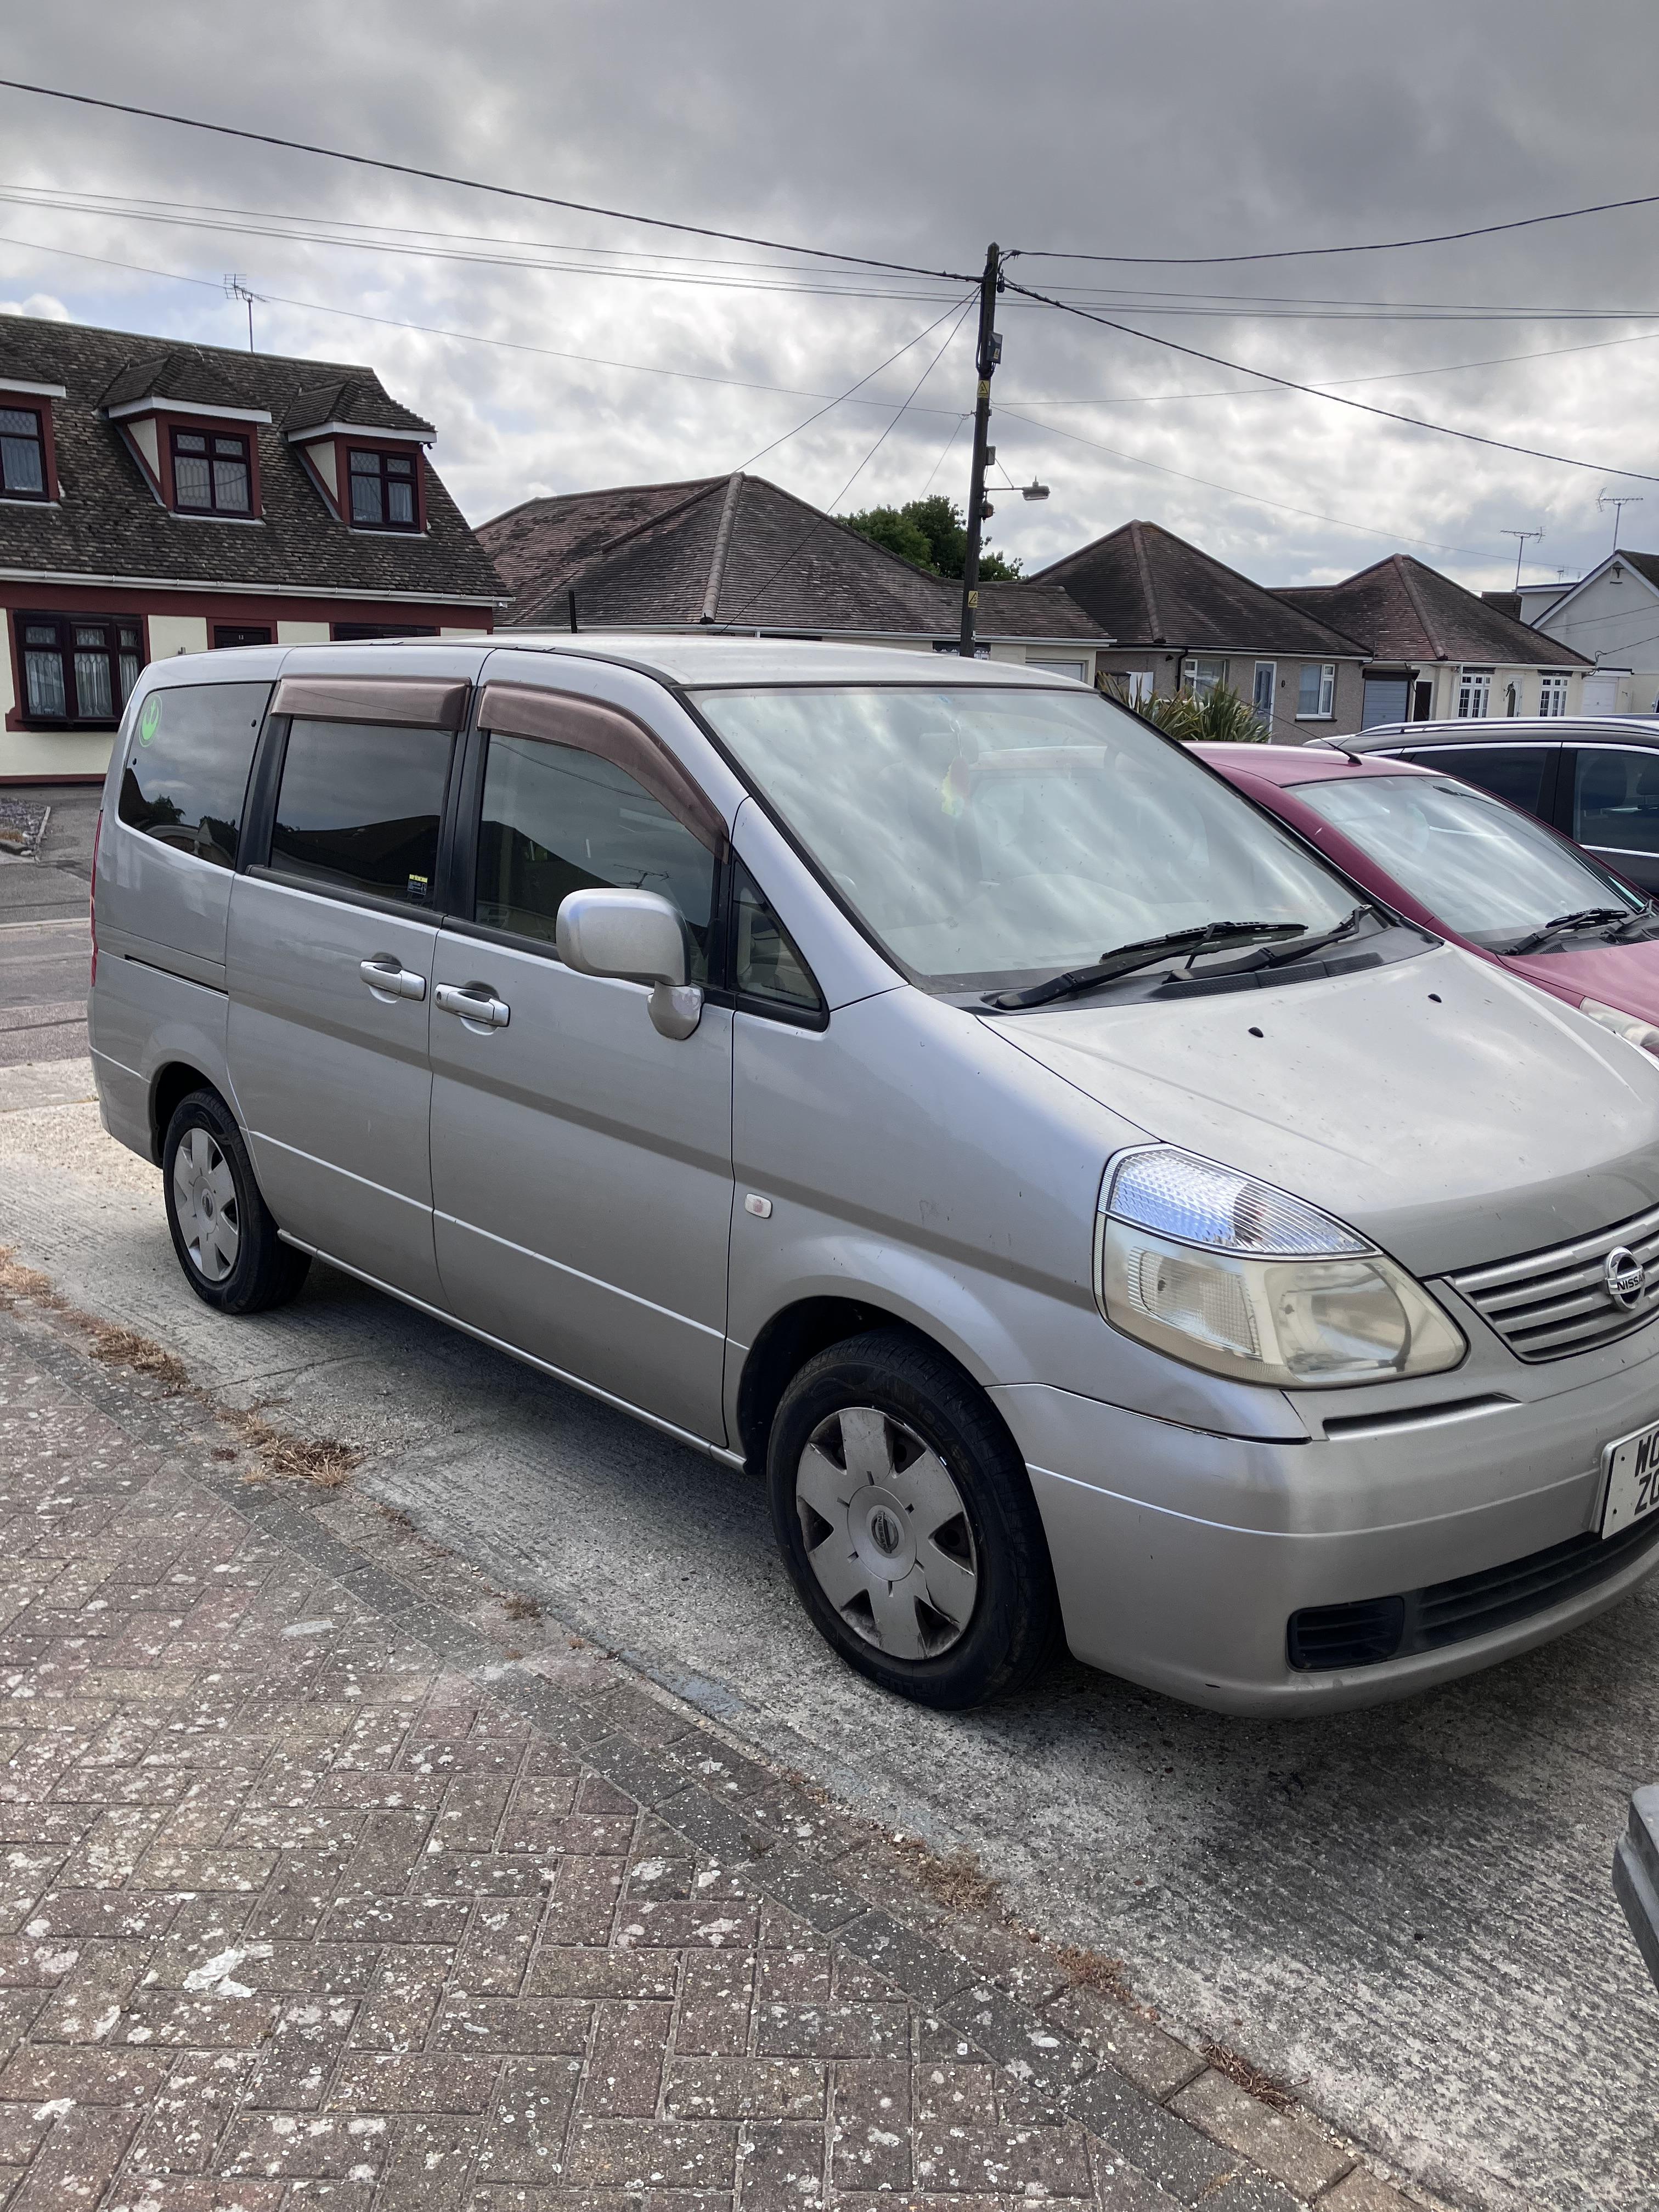
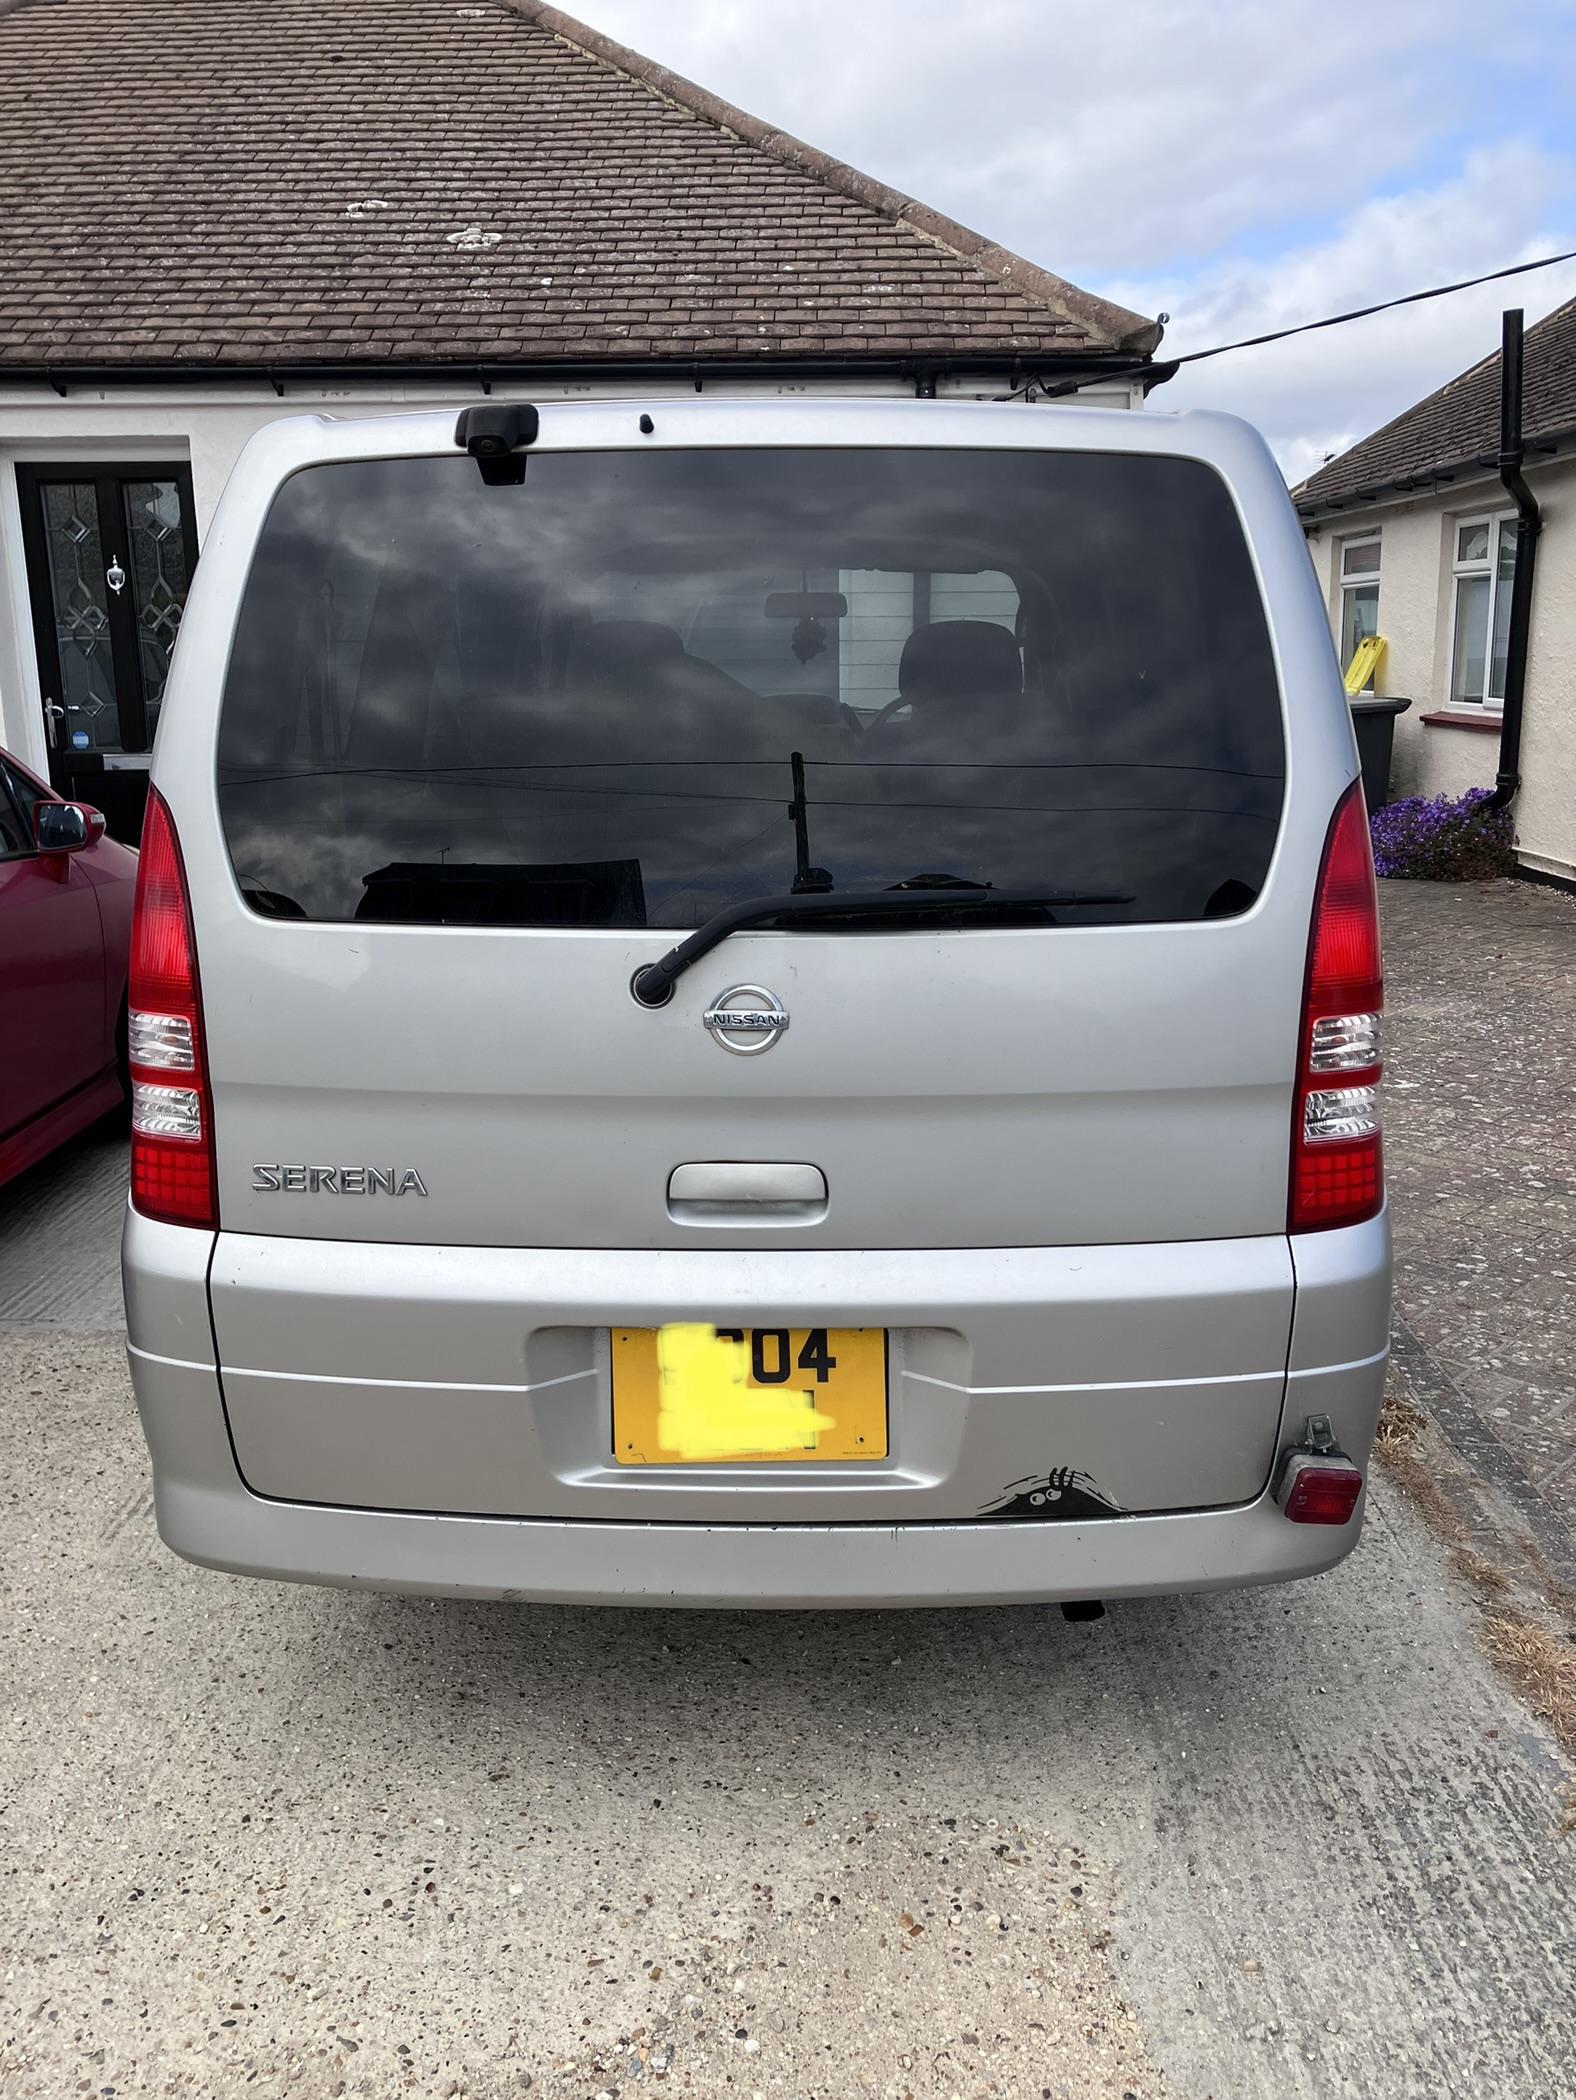
Hi Im in the Southend on sea area and sadly selling my Nissan Serena cvt. 2004. 174,854 miles, 1990cc automatic 7 seat mini van. This van is well used, scrapes on bumpers tatty wheel covers some paint missing from the side mirrors. Interior is stil in a reasonable condition. Main issues that need attention is the right hand lower suspension arm needs replacing and the automatic side door motor also needs replacing ( wasn’t working when I bought it) tires are brand new and has mot till October. Condition apart from suspension arm is how I purchased it. Engine runs lovely still. Selling as no longer need a big car. £1200 ono
 1 point
 -
Just come across a video suggesting that the neutral position switch on the gearbox may also have gone. Diagnosis is to turn on the Engine heater switch then engage a gear. Revs should return to normal idle if the switch is operating. My car does not return to idle. Stays revved up and I canove forward without there being any change Could this contribute to the error lights I'm facing?1 point
-
That definitely sounds like a poor earth somewhere in the engine bay area.....check the earth lead from the battery and any that may be attached to the engine and body Also on the offchance, it may be something simple like a bulb.....check the rear indicator and tail lamp bulbs are the correct type as sometimes if incorrect they can backfeed current through the electrical system and create faults like you describe1 point
-
You can pop to Halfords and get some universal coolant (pre-mixed to the correct quantity) and top up the tank However, there should be a min-max markings on the tank and should be topped to just below max when the engine is cold1 point
-
Hi Trevor Yes the fan spins but not when connected 😞 after failing miserably to remove the fan unit I went back to basics, read posts on the problem with most saying 90% of failures are not the motor itself but the dodgy connector. So cleaned connector best I could I fitted motor back into position, still not working. Next speed control resistor, this I initially ruled out as it was fairly new but to be sure I purchased one on eBay, fitted it and yes it works, better than it did before. so lesson learnt, check the obvious and easiest parts first before stripping the car apart 😀 on plus side know now how to remove top of dash in about five minutes, downside is I need to source another air pipe after I cut the other one away, good old gaffer tape is holding it for now.1 point
-
Hi thanks for your reply I'm confident the other switches are ok as the interior light now comes on which ever door I open so I assume there working.1 point
-
Engine fault light and lane departure light apparently due to loose battery connection. Driver’s side mirror when reversing still not fixed still points upwards instead of down.1 point
-
Thank you for the welcome Trevor and thanks for the links will have a look now.1 point
-
We bought a nearly new Tekna 1.3 after a previous diesel Qashqai. . It was £27,000 NEW in 2018 We had problems with the child lock engaging when driving and unable to disengage. This was erratic and they replaced one under the warranty but as they couldn't witness the other one, they refused to repair. Eventually, we had to take a video when it (inevitably) occurred again and they agreed to fix it. We have recently had gear change problems when we try and change gear in the lower gears. We tried Nissan but they can't see us for two weeks so as it's out of warranty, we took it to our local garage who believe it is the slave cylinder and will immediately repair. It also takes a lot of revs to release the autobrake leading to dangerous situations driving off. But it only has 35,000 miles on it and we've NEVER had an issue with any other car like this so early on. As the original poster said, we haven't suddenly changed how we use the gears. And our VW which we have from new in 2017 still has lovely smooth gear changes. It seems Nissan are going the way of Peugeot and instead of producing good cars are now producing bad ones. This will be our last Nissan. 😟1 point
-
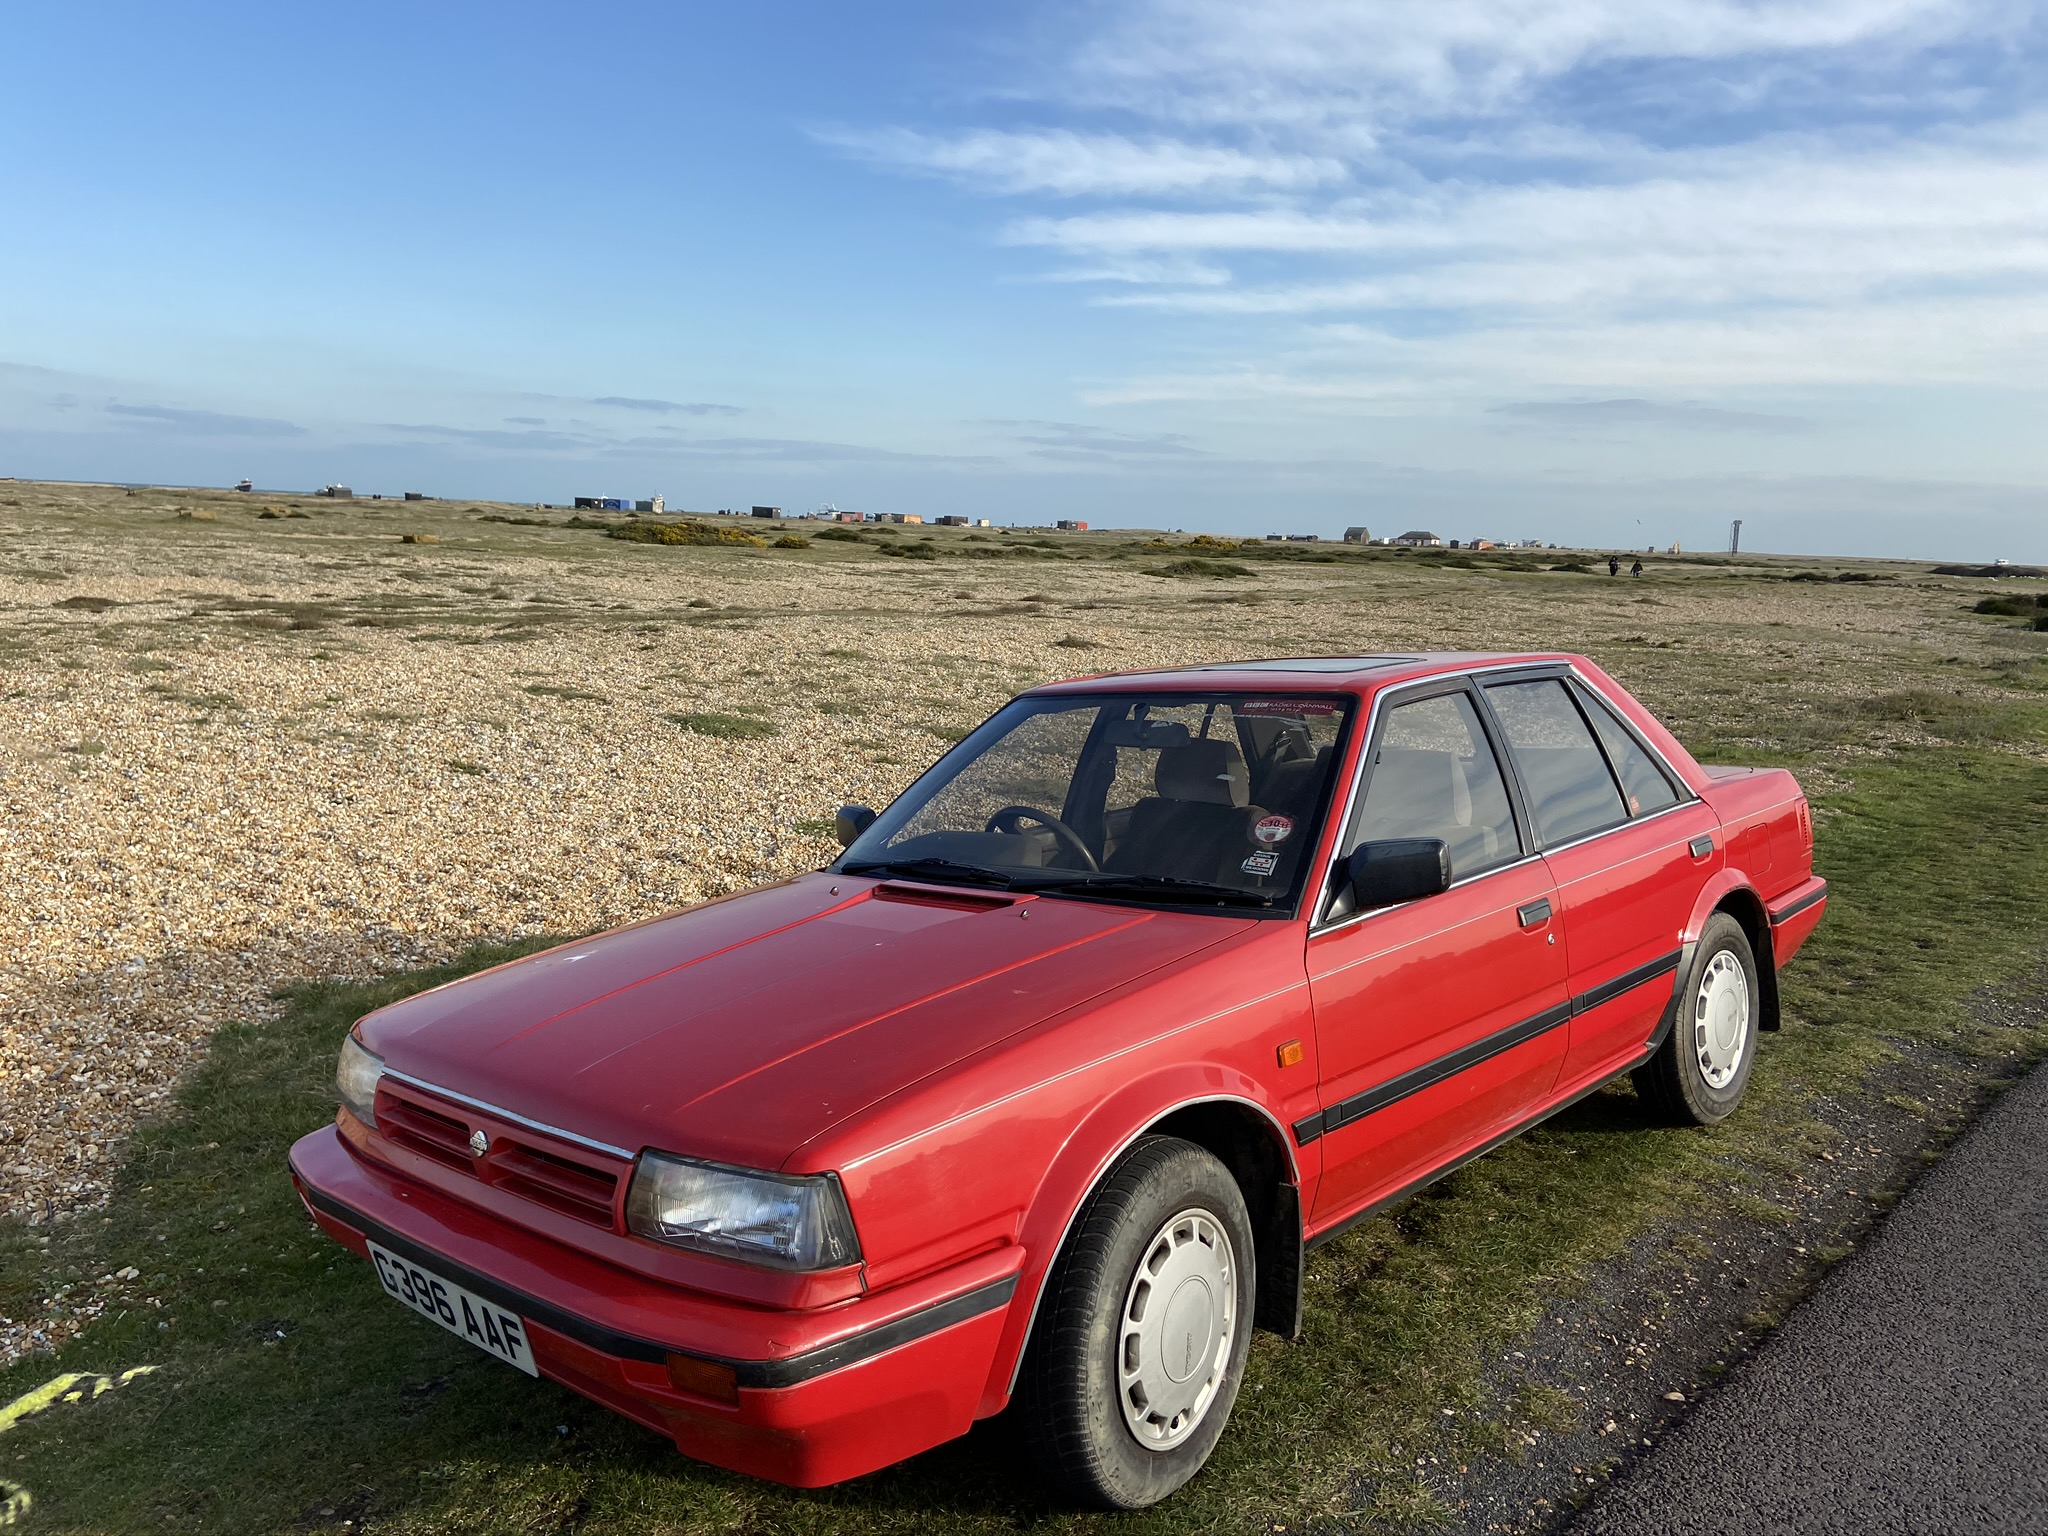
1989 Nissan Bluebird for sale Red 1.8L engine Automatic Hello, I’m trying to sell my lovely vintage Nissan Bluebird. The car has been off road for the past 6 months due to a relocation, and I can’t keep it any longer. MOT recently expired, and has a small (I’m told) engine problem, so new buyer would need to tow it. All working parts inside and under bonnet aside from engine problem. Drivers side electric window in need of new motor. It’s been well looked after, I’ve had it 3 years and before then was kept in storage for 10 years by an old collector. 65,000 miles approx very low for the age. I’m looking to sell for £1000-1500 but will consider any sensible offers in this region. I can be contacted on 07718 927124 and email ciaranthomaswood@gmail.com thanks

 1 point
 -
Thankyou Trevor.it has 13 inch steels on with a 175 75 profile I think but I've found a set of 14 inch alloys from a 90's nissan I think a 100nx?? And am going to have them resprayed and 4 new proxy tyres1 point
-
Would any one like to swap their GTR for my 350z…one lady owner, never drifted1 point
-
hi same has just happened to my note been looking on ebay for replacement are the ones listed for nissan juke the same? https://www.ebay.co.uk/itm/2040006817431 point
-
Hi all new member here i am looking at getting a Nissan highway star and cant find the right sub to post it in in here.. someone point me in the right direction please.. never owned a Nissan before so looking forward to speaking to you all.1 point
-
Hi all Recently bought a Murano 2.5 petrol Z51 Engine 2009. Looking forward to picking some brains here and sharing my knowledge too. I live in Auckland and have bought a Japanese import, very common here. It's a great car but am sure I'll have some questions soon! Cheers Nick1 point
-
Thanks for your advice Trevor. ill take a look.1 point
-
Hi there I have a 1988 nissan bluebird lx 1.6 for sale. The car has been garaged for the last 31 years (up to January 2021) and is mot'd until November 2022. I've been passed this vehicle from my gran who looked after it very well but she no longer drives. I'm looking to sell at around £1300/£1400 but will consider any sensible offers in this region. Photos attached. Please contact me on 07837 232737 or by email at lawrence.cormacey@gmail.com1 point
-
Yes Trevor we will there is a place and they have different lengths I'll find the web site over weekend1 point
-
Thank You. I have used Eurocarparts a few times in the past but they aren't as cheap as they used to be even with their constant discounts. Case in point, I recently needed an Indicator Bulb for my Astra Estate, its not a Normal bulb it's fitted in a holder you buy as part of it. It's a Bosch Bulb and Eurocarparts wanted £32, I found the same Bosch Bulb online for half the price. I do try to use Quality Branded Parts For Servicing and a Good Quality Oil for Oil Changes. Buy cheap and pay twice unfortunately1 point
-
These issues sound a lot like software problems of the actually audio unit. Nissan do run software updates but you have to visit a dealer and request it. The update usually fixes issues such as Bluetooth connectivity issues, calibration and restarting issues. If problems persist however then you’re looking at audio unit replacement which I think are fixed in France.1 point
-
You should ideally change both at same time given they’re both the same age and done the same mileage.1 point
-
Thanks 😊 yeah you don’t see many and when I saw it come up for sale and the condition it was in I couldn’t pass it up. Only 49k from new! great to be on board 👌🏻1 point
-
Hi I have driven all sorts of vehicles cars bikes vans to articulated lorries. I have also driven electric vehicles before so it was not an issue, the issue was going to be around regular charging at home. My local and county council are stating the have no plans in the foreseeable future to install charging at the roadside in residential areas for people without access to off road parking. Their view is they want local residents to use public transport rather than their own vehicles so it looks like a backdoor way to force people out of having their own cars. I took the issue up with my local MP who also happens to be the secretary of state for transport. I had a dace to face meeting with him pointed out the councils proposed plans and informed him that 23% of the local vehicle owners were being prevented from taking up electric vehicle use. He appeared quite interested in the points I raised and said he would look at what action he could take to assist in the matter. Then some weeks latter like all good politicians he contacted me by email providing all the information and figures I had already given him indicating there was nothing he could do. I will now stay with an ICE vehicle for as long as I can before maybe then switching to hydrogen fuel cell vehicles if they materialise as they will be a better choice for people without access to off road parking.1 point
-
Think it shows the fitting points in the manual1 point
-
I would start with the grease, clean it from the reluctor ring and go from there1 point
-
Hi....welcome to the Club Two things come to mind... 1. Crankshaft Sensor which looks for rotation of the crankshaft which will signal the Engine Management System (EMS) and give the command to fuel and spark dependent on engine speed. If this is faulty (usually when hot and the resistance changes) then this can cut the engine and start when cooled down. 2. Throttle Body adaptation which is adjustable using a scan tool. A lot of times this comes down to carbon build up and benefits from cleaning which gives a constant smooth idle speed A scan of the EMS should give stored fault codes which lead to a more precise diagnosis Let us know how you get on with it all1 point
-
Thanks Trevor, I feel the same, it's still under Warranty and I've since found out they can be re-calibrated for free so I'm going to pop into my local Nissan. I'll keep you posted with result 🙂1 point
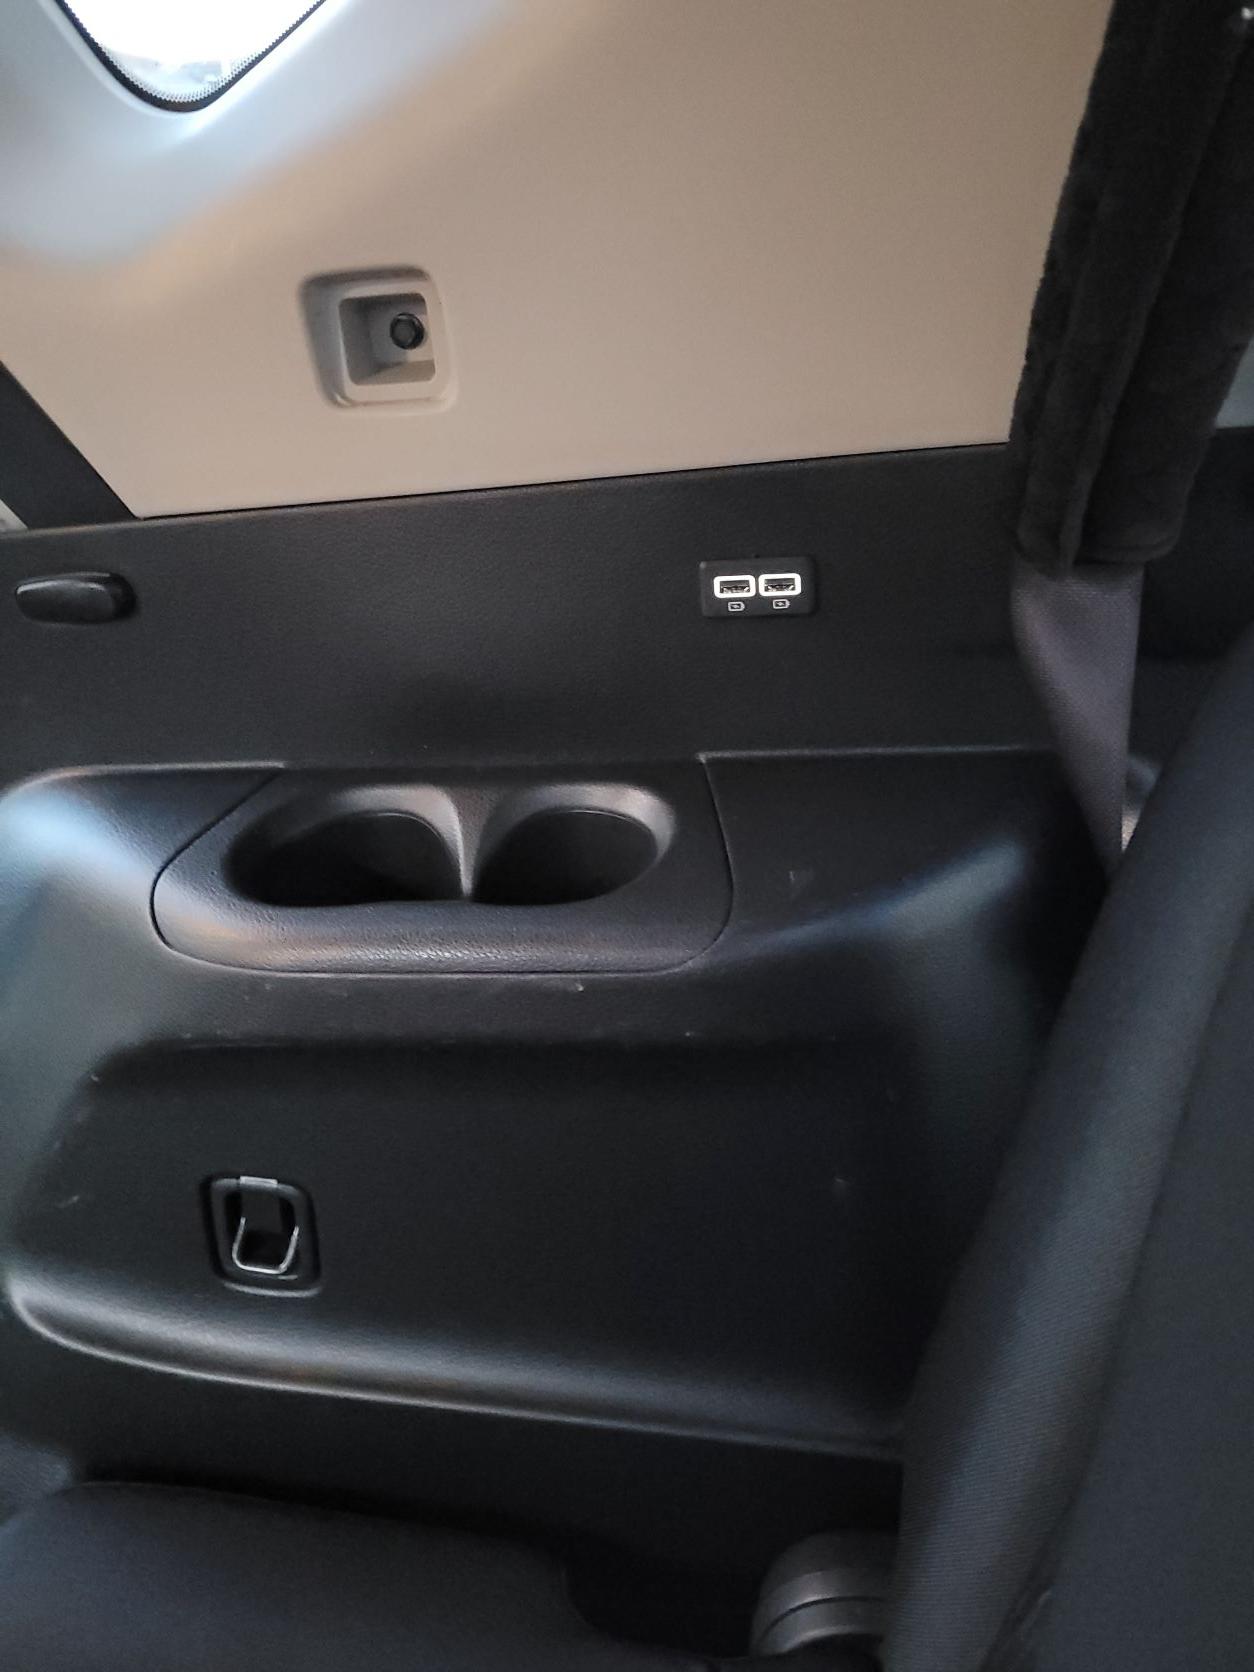
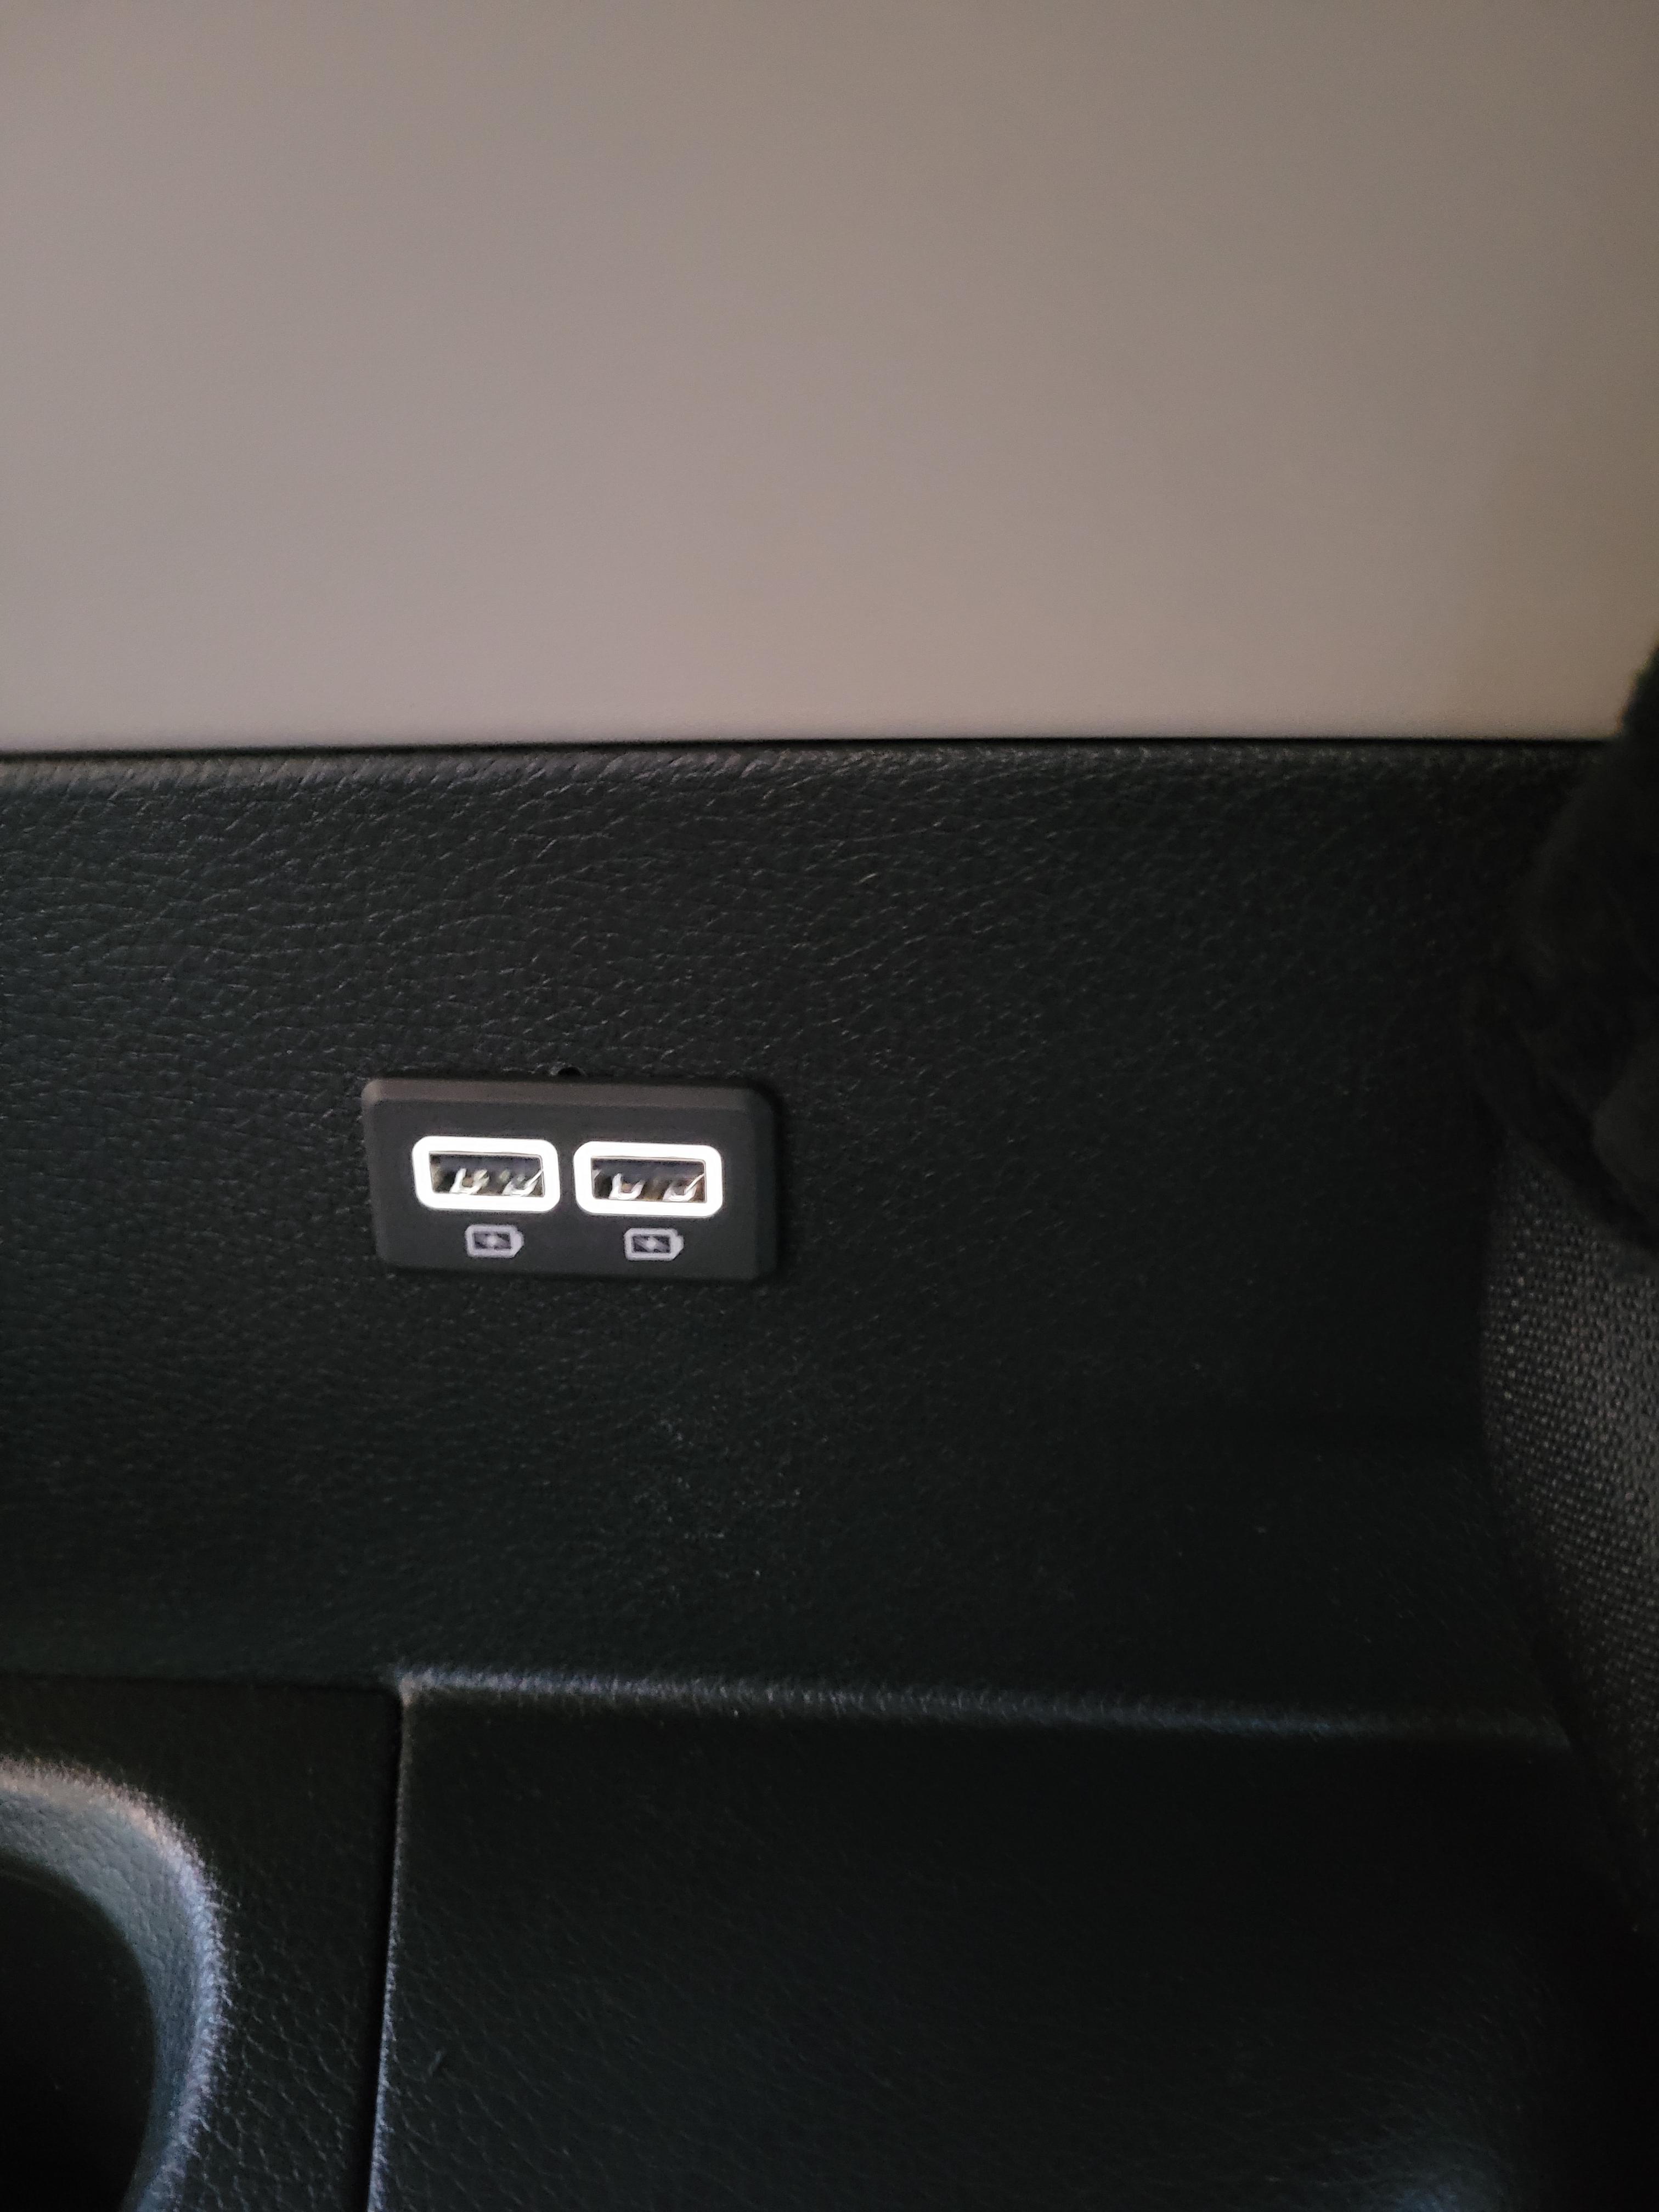
-
Thanks Trevor Here is the USB port template for the centre console: And some of where I placed the double USB port for the 3rd row seats: xtrail usb port template.pdf
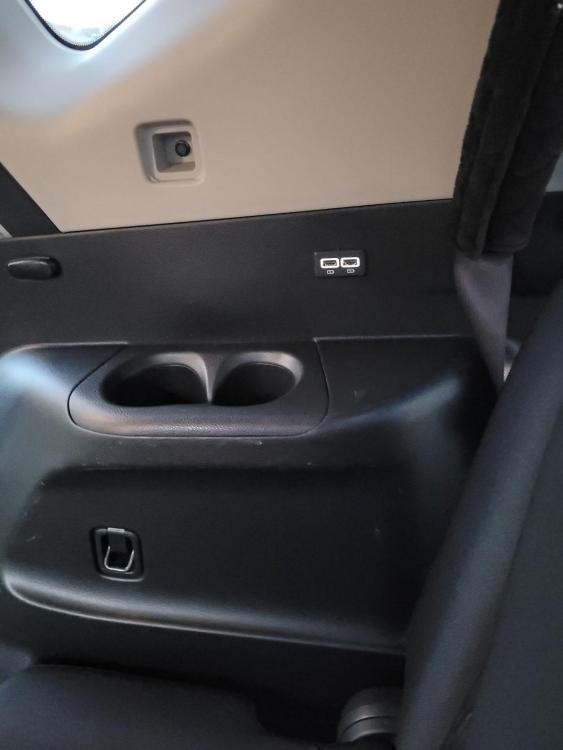
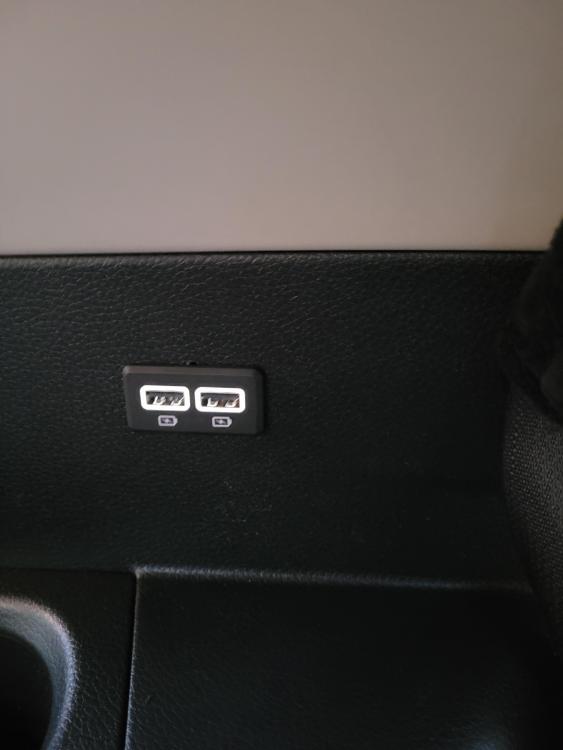
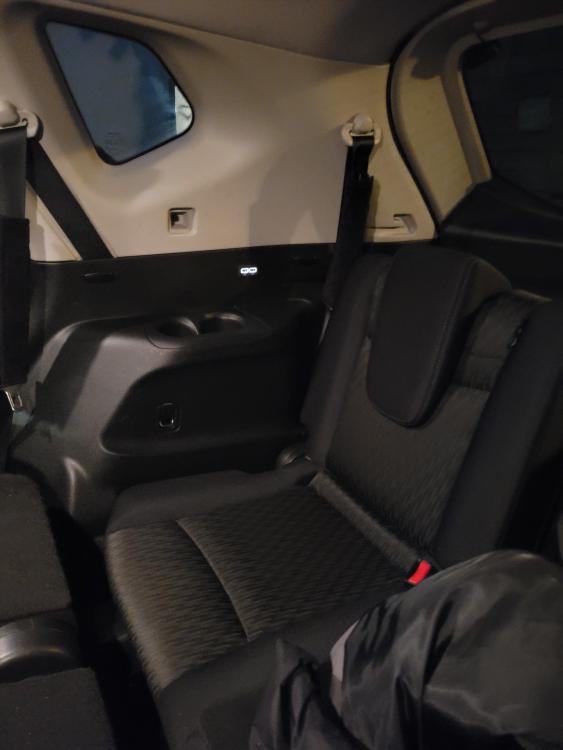
 1 point
 -
I've just got off the phone to Nissan (Colebrook way, Andover) they've advised me to take it back to the garage that fit the head gasket and check that they've plugged the sensor in properly. I've basically got to start at the beginning and work out the problem. On a positive note the sensor light stayed off for the mot and passed today 🙌 booked in next Friday (once I'm out of isolation). Fingers crossed its something so simple 🤞1 point
-
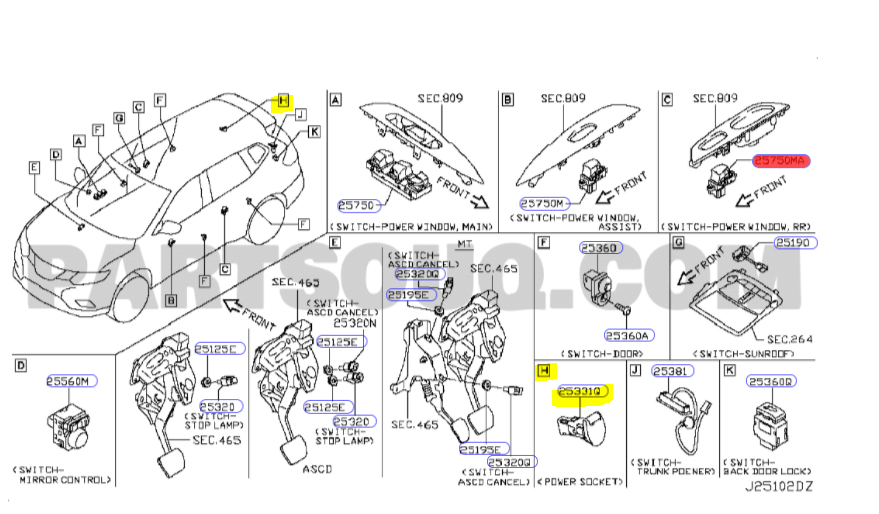
I think its a very handy accessory. I'm considering adding another towards the rear of the car. Cross referencing the part numbers for the 12v power socket in the centre console box, and the one at the rear of the car, they have the same part numbers. Centre console: Boot: So that does technically mean that the cabling that comes with the usb package, should fit the onto the wiring loom in the boot also. I'll rake a chance and order one, and see what space there is to mount this in the 3rd row of seating/boot area. For information, I bought the kit for £21 from a Renault parts dealer on ebay. Other sellers have them on there for up to £68. So worth it, I believe for an OEM part.

 1 point
 -
Sadly not! We had to pay the cost of replacement Clutch of £1800 plus an AA report of £200. The AA sent ACE (Automotive Consulting Engineers Ltd) to carry out the inspection which concluded that the Clutch had over heated which caused the failure. No suggestion as to cause other than abuse and referred to Towing in the report which did not mention that there is not a Tow Bar on the car! The report appeared to me to have a large element of "cut and paste" about it. I tried to contact ACE for more details of the inspection but they did not respond I contacted Nissan and asked if they could Inspect the components and the Dual Mass Fly Wheel, they declined and suggested I look on the Internet to find someone to inspect it but could not suggest anyone. The Nissan "Adviser" declined to discuss the matter any further with me and refused to put through to a Manager. We reject the suggestion that we "ride" the clutch as there is adequate spec by the clutch pedal to rest the foot and we have suddenly become bad drivers. I took legal advise and my Solicitor advised that we could become involved in a costly dispute. We are left with a car that my wife is reluctant to drive as she has lost faith in it. We ask ourselves three questions. Would we buy another Nissan, would we recommend a friend to buy a Nissan and are we satisfied with Nissan's Customer Care? NO, NO, ABSOLUTELY NOT.1 point
-
Nissan Micra K12 Throttle Body Removal and Clean Welcome to this guide on how to remove and clean the throttle body on a Nissan Micra K12. This procedure was done on a 1.2 2003 petrol model. As I couldn't find a good tutorial on this process I thought I would have a go myself and then put together this guide for other people. The process is actually relatively straight forward once you know how. I was experiencing juddering at certain points on the rev range and when the car was in a certain gear, MPG had decreased plus some hunting when the car was idle. So I decided that I would clean the throttle body to see if that would help. I actually didn't know exactly where the throttle body was located on this model. It's actually located under the air intake box/top manifolds which are shown below. It's actually located inside and under the top of the plastic manifold housing. Once you have removed the throttle body you will realise that it's actually connected to one of the electrical connections on the top of the housing that you will need to disconnect as part of this process. Throttle body location This is where the throttle body is location on a 2003 1.2 petrol Nissan Micra K12. Tools required This is a list of tools and other items required to get to the throttle body, remove it from the housing and then clean it: Pliers or grips 10 mm socket Ratchet Toothbrush or cotton buds and an old but clean cloth A good carb/throttle body cleaner The process So here are the steps. Step 1 - Remove the air intake and air filter box Remove the air intake pipe (highlighted by the red arrow) by removing the plastic lugs that hold it to the front of the engine bay and then remove the other end from the air filter housing on the right. I had to slightly twist mine and then gave it a hard pull to detach it. Then remove the air filter housing from the manifold housing. Do this by unclipping the metal retaining clips (highlighted in blue in the image below) located on the front and the right side of the housing. There are only two clips that hold this in place. They simply unclip upwards and one remains connected to the top housing and the other remains connected to the air filter box. Once you have unclipped the air filter housing the front of it may drop away from you. It should not fall off completely as the back is held in place by the box being slid into holders in the back of the top housing. To remove the air filter box simply push the front down and when it's at a certain point pull the air filter housing towards you. This will pull it out of the rear mounts. Try to look at the rears mounts when you do this so that you can be sure you pushed it down enough to be able to pull it forward without snapping the plastic mounts on the back of the top housing. You should see this when the air filter housing has been dropped away from the top housing. The air filter itself may have stuck to the underside of the top housing like mine did so just pull it off and place to one side. I would suggest replacing it with a new filter whilst you are doing this as you will have to put it back in when you reassemble. Now just slide the air filter housing out of the engine bay so that you can continue. You will see this. Step 2 - Disconnect Electrical Connectors Disconnect the three electrical connectors as highlighted in red. The one to the left of the top housing is the actual throttle body connector. Once the one in the middle of the top housing is unplugged, make sure you gentle pull it out of the recess that the rest of the cable lies within and gently push it to one side out of the way. Do not just pull these connectors as they are made from plastic and will snap. They all have a small tab which needs to be depressed at the same time as gently pulling them. Do not pull them too hard as they do not need it. They will disconnect very easily if the tab is pressed whilst pulling them. Step 3 - Disconnect Breather Pipes/Hoses Disconnect the two breather hoses/pipes as highlighted in red. You will need to use a pair of pliers to release the retaining clips that hold the end of the pipes tightly sealed in place. Just squeeze the release arms on the retaining clips with the pliers and slide the retaining clips along the pipes until they are free of the housing connector. Now just gentle pull the hoses/pipes off the housing connectors. Again, you do not need to pull these hard. They should just slide off with a light pressure. Remove the centre hose from the recess in the top housing and push it out of the way. You should now see something like the image below. All electrical connectors have been disconnected and the hoses disconnected. I took this picture before I had moved the centre hose out of the way so you shouldn't have this in place at this stage. Next remove the breather hose mount, shown below, from the top housing. If you don't remove this you will not be able to remove the top housing completely if you leave the rear hose attached. Alternatively, you could leave it bolted on and just remove the other hose from it and then remove the top housing with the mount attached. I just unbolted it and pushed it out of the way so I didn't damage it. Once you've removed the mount then it should look like the image below. Just move it gently out of the way so that it doesn't interfere when you remove the top housing. Step 4 - Remove Top Housing You can now remove the top housing by simply removing the bolts highlighted in red in the below images. They are all 10 mm. Remove the three front bolts. Remove the two bolts on the left rear of the housing. Remove the two bolts on the right rear of the housing. Once the seven bolts have been removed you can simply pull the top of the housing up towards you and it should separate from the bottom section of the housing. Warning: Do not pull this top section up too hard. You should be able to just pull it up with a little force. The top section is attached to plastic manifold inlet pipes toward the rear and they are pretty much held on by O rings. Try to pull the top section of the housing up towards you in a straight motion. Try not to bend it as you pull it up. It should come off fairly easily. Warning: This top section actually contains the throttle body itself so take care. Do not just drop it to one side as you may damage the throttle body that you are about to clean - if you are not replacing the throttle body itself of course. You should now see the image below once the top section is removed. Step 5 - Remove Throttle Body From Top Housing Once you've pulled off the top housing turn it over to see the location of the throttle body. Simply remove the three bolts that are highlighted in red in the image below. They are 10mm so just use the same socket you used to remove the top housing bolts. Once you have removed the three bolts you can now remove the whole throttle body. The throttle body is now only held in by the top of the electrical connector on the outside of the top housing. It's a bit tight so just pull the throttle body towards you whilst wiggling it slightly as the rubber seal is a little tight. Don't put too much force as you might snap the plastic top housing. You should now see the housing like this once the throttle body has been removed. Step 6 - Clean The Throttle Body To clean the throttle body I used a small headed toothbrush, some clean rag and a good carb / throttle body cleaner. Warning: Carefully follow the instructions on the carb cleaner. Do this work in a well ventilated area, preferably outside and wear a suitable breathing mask. Take extreme care not to inhale the fumes from this cleaner or the dirt that it removes from the throttle body. I used the following carb cleaner which is available from a well known parts store for about £8. This was the state of my throttle body when I got it out. It was really clogged up and clearly sticking. Simply attach the small pipe to the can of carb cleaner and then spray into and around the inside of the intake of the throttle body and all over the butterfly valve. Then just brush the whole of the inside of the intake (front and back) and butterfly valve with the toothbrush and/or rag. The dirt should come off quite easily as the carb cleaner is really effective. Keep doing this until the intake and butterfly valve are as clean as you can get them. Keep wiping off any residue with a good clean rag as well as you do this. After about 10 minutes of cleaning I had a nice clean throttle body as shown below. Yours should look pretty similar when complete. Step 7 - Refit Your Throttle Body And Reassemble Other Parts Warning: Before refitting your cleaned throttle body you should ensure that the throttle body is dry and does not contain any residue from the cleaning agent. I left my throttle body to completely dry for about an hour or so just to be extra cautious before proceeding with refitting. Refitting your throttle body and reassembly is just really this guide in reverse from step 5 back to step 1. Warning: Take care when reattaching the top of the housing to the bottom and the intake pipes as they have O rings present. Ensure that they are correctly aligned before pushing the top housing down into place. Be careful not to pinch or tear the O rings. If it's tight to refit over the O rings then either replace the O rings or simply apply a small smear of engine oil around the O rings which should help refit the top housing. Warning: Do not over tighten the bolts that hold the throttle body in place or the top housing. Warning: Once you have reassembled everything it is a good idea to just double check that all the breather hoses are reattached and secured in place and that all the electrical connectors are attached securely. You should now be able to start the car and test accordingly. If this process has been successful then you should have a smoother throttle response and possibly more accurate. Mine stopped juddering at certain revs and seemed so much more responsive. I am also now getting much better fuel economy.1 point